
Above Photo Courtesy of Summers MFG
The reasons why farmers till the soil haven’t changed much over the past several decades, but the tools they use have evolved in significant ways. The proliferation of implements developed to cultivate farm fields have greatly refined tillage operations, while at the same time trying to figure out the right tool for the right application can leave growers perplexed about what they should be using.
Recall a published report a few years ago when a grower borrowed his neighbor’s vertical tillage tool to size corn residue in one of his fields. Heavy rains afterward washed the crop residue to the edges of the field and into adjacent drainage ditches, which exacerbated flooding in the area. The farmer claimed that vertical tillage had caused the problem, which, he said, resulted in the worst erosion he had seen in his 30 years of farming.
Upon further investigation, it was determined that the grower ran the vertical tillage tool about 2 inches deep on top of earlier disc and cultivator passes, which had created a solid layer of soil below the vertically tilled surface soil. Everything in those top 2 inches was loose, but the rain couldn’t infiltrate the hard pan layer just below the surface. This caused the top soil and residue to wash off contributing to the flooding and erosion issues the grower complained about.
In other words, it was the incorrect use of the tillage tool that caused the problem, not the implement itself.
While an equipment dealer couldn’t have helped in this case, this example illustrates how a lack of knowledge can lead to big problems in the field. It also adds a big exclamation point to the growing need for equipment salespeople to develop a “value-added” mentality in helping their farm customers select the right tool for the application. In other words, they need to be “subject matter experts”(SME). When making a significant purchase decision, customers prefer to work with SMEs over strictly salespeople.
The following report is not designed to make dealership salespeople experts on tillage tools, but it could begin to point them in that direction. It is simply a basic “primer” on the most common types of tillage tools and their proper application. It also suggests that determining what a farmer needs in the way of tillage takes some digging. To help with that part of the sales process, please see “5 Questions to Ask When Selling Tillage Tools” at the end of this article.
Dealer Takeaways
- When customers are looking to match the right tillage tool to their specific need, they want to work with a “subject matter expert” who is knowledgeable about the full range of tillage tools available.
- Manufacturers aren’t always consistent on what they call certain tillage tools, so it’s important to have them describe what the tool is designed to do regardless of what they call it.
- Some agronomic knowledge is helpful in determining how a tillage tool can impact crop standability and yield.
Primary vs. Secondary Tillage
Farmers till their soil to achieve a wide range of outcomes, from preventing disease to controlling insects and weeds. Others perform tillage operations to correct soil compaction and other conditions, and to prepare a seedbed for planting. There are also agronomic reasons to till the soil, which can include improving drainage, warming up and drying out in spring, prior to planting. Whatever the reason, there is a wide range of tillage tools available to accomplish the desired outcome.
Still, others till their soil because their father and grandfather did it that way. Old habits and traditions die hard.
Tillage tools generally fall into one of two categories, primary and secondary. These are general categories, and some tools can be and have been used for both primary and secondary purposes. In this report, primary tillage, such as plowing, generally involves deeper and more aggressive working of the soil. It is employed to kill weeds, aerate soil and allow for the infiltration of water. In many cases, it is also used to bury residue, but not always. It tends to leave large chunks, or clods, of soil in its wake that require additional tillage to break up the clods and level the soil surface prior to planting.
Exclusively Online
Secondary tillage is usually shallower and aimed at surface treatment of soils. Its purpose is usually for breaking up clods, leveling the surface, resizing residue, controlling weeds, incorporating fertilizers and preparing the seedbed for planting.
One of the biggest challenges growers face today is managing crop residue, particularly when running corn-on-corn with high yielding varieties with their thicker, tougher stalks. The goal is to get the residue laced into the soil but to leave pieces of it sticking up so that it can still draw oxygen down into that material and break it down. Some primary tillage tools, like moldboard plows, which are effective for disease and weed control, do too good of a job burying residue. As a result, they aren’t good residue managers because the stalks, etc., aren’t exposed to oxygen and, in some cases, after years of being buried do not decompose to give nutrients back to the soil.
Common Tillage Tools
Following are 12 types of tillage tools commonly used to a greater or lesser degree in farming today. Typical applications where the use of the tool is appropriate and effective are described, as well as nuances that pertain to the equipment.
Subsoiler. The subsoiler is considered primary tillage and is typically used after harvest to reset the vertical profile of the soil and to alleviate soil compaction. It operates as deep as practical in a given soil and geographic area — generally 12-18 inches.
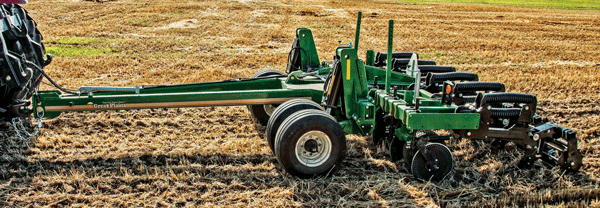
Subsoilers are typically used to reset the vertical profile of the soil, as well as to eliminate compacted soils and ruts in fields. It is considered a vertical tool because it buries very little crop residue. Photo Courtesy of Great Plains
It can be considered as “ true vertical” tillage as it buries very little crop residue, but the amount of soil disturbance depends on the shape of the shank and the working angle of the tool bar. It is often used to eliminate ruts caused by the use of heavy equipment in the field (large tractors, combines, grain carts, etc.) to reset the soil profile only in those areas. Typically, subsoilers do not use sweeps that can “shear” the soil. Subsoilers can be used intermittently as needed and are seldom used every year in the same field.
As a rule of thumb, pulling a subsoiler requires about 50 horsepower per shank, so a 5 shank tool will need approximately 250 horsepower to operate efficiently.
In some cases, V-rippers, which were more commonly used several years ago, are put in the same category as subsoilers, but there are significant differences between the two. Typically, V-rippers are built on a swept-back frame and have large parabolic shanks that invert the soil, which produces very large chunks. These tools disrupt the soil to a larger degree and bury far more residue than a subsoiler.
Moldboard Plow. The tool most often associated with primary tillage is the moldboard plow. It is typically used after harvest to bury as much as 80-90% of crop residue. It is extremely aggressive in lifting and inverting 9-12 inches of soil and requires one or more passes with a secondary tillage tool to make the soil suitable for planting.

Moldboard plows, which lift and invert as much as 9-12 inches of soil and bury 80-90% of crop residues, are among the most aggressive primary tillage tools used. They’re also effective weed killers. Photo Courtesy of Kuhn
One of the issues often associated with the moldboard plow is shearing of the soil, creating a density change between topsoil, which is loose, and soil below the shear, which is much firmer. A rule of thumb for soil density is at 250 psi, roots are not able to penetrate the soil.
This hardpan layer restricts root growth of the plant, especially grass crops like corn, forcing them to grow sideways, instead of straight down where they can absorb moisture and nutrients. When a root system spreads out instead of growing downward, it will compete with nearby plants for available water and nutrients. In addition, shallow root systems impact the standability of crops like corn and in extreme cases the plant can literally fall over. Poor, restricted root systems ultimately reduce crop yields.
This change in soil density, which is also called a “tillage layer,” can also be caused by other primary tillage tools, such as disc harrows and field cultivators.
Moldboard plows are very effective and helpful in burying crop residues, especially where there is excessive buildup, like in corn-on-corn production. But for it to decompose properly and become a nutrient for future crops, the residue requires contact with moisture, soil and oxygen. Buried beneath 10-12 inches of soil prevents its exposure to oxygen and complete decomposition often does not occur. While the crop residue is buried, it isn’t necessarily broken down.
Some believe that inverting soil to the extent that takes place with a moldboard plow also raises the risk of bringing weed seeds to the surface, which can lead to germination and growth of additional weeds.
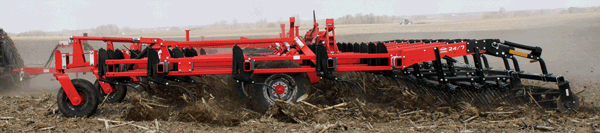
Disc Chisel. This tool is usually run after harvest, but in extreme cases when weather prevents fall fieldwork, disc chisels are used in the spring. They typically bury 50-75% of crop residue and generally require about 20-30 horsepower per shank to work efficiently. Disc chisels size residue into smaller pieces to speed decomposition. These tools have gained in popularity with growers who prefer to bury more of their crop residue than vertical tillage does.
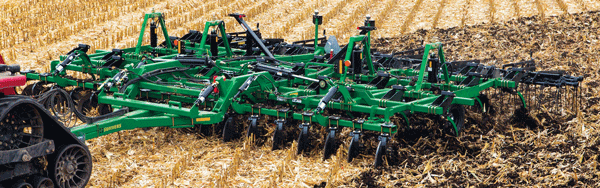
Disc chisels size residue into smaller pieces to speed decomposition and typically bury 50-75% of crop residue. They are usually used after harvest, but if weather prevents fall tillage, they can be run in the spring. Photo Courtesy of Summers MFG.
This is another tool for primary tillage, but it also falls into the “vertical tillage” category. Even though the coulter blades are not vertical, the chisel shanks run below the disc level, which removes the density layer.
Chisel Plow. This is a primary tillage tool that can be considered either “vertical” or “conventional” depending on whether it is used with vertical points or sweeps. Components of a chisel plow can include various types of sweeps, spikes and shovels attached to the shanks.
A chisel plow can be either vertical or conventional depending on whether it is used with vertical points or sweeps. This equipment can typically bury more than half of the crop residue in a field. Photo Courtesy of Kuhn
In row-crop areas, many producers use 2 inch wide reversible point spikes or 2.5-4 inch wide twisted shovels. Spikes and sweeps do less soil mixing and cover less residue than do twisted shovels. A typical chisel plow will cover 50-60% of crop residue.
Another point to consider is if vertical points are used, they will not create shear or a density change. If a chisel plow is run with sweeps, it will create shear and result in a density layer.
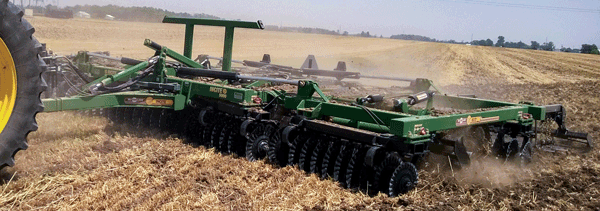
Disc Ripper. This is a primary tillage tool that falls into the vertical tillage category. This tool must be run in the fall after harvest and leaves the soil extremely rough and cloddy. (“You can’t drive a pickup over it.”) If run correctly, its shanks need to be run 15 inches deep or more to be effective. It requires 50 horsepower per shank and buries 70-80% of residue.
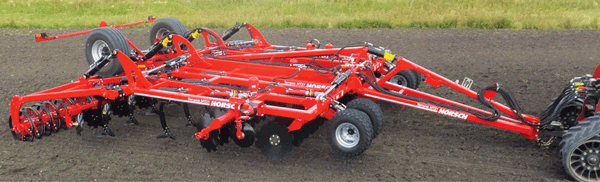
Disc rippers are primary tillage tools used after harvest to bury 70-80% of crop residue and set the stage for seedbed preparation in the spring. Originally, its shanks were run 15 inches deep. Today, 10 inches deep often works well. Photo Courtesy of Horsch
Disc rippers were particularly popular several years ago, but more recently growers have turned more to subsoilers or hybrid disc chisels to achieve the same or better results.
Originally, disc rippers utilized large parabolic curved shanks mounted behind disc blades. The discs chopped and rolled the soil and the shanks then loosened the soil. To work properly, the shanks needed to run 15 inches deep. This creates topsoil that was like a marshmallow, leading to tractor tire tracks and ruts throughout the field during planting.
In other cases where the farmer didn’t have the horsepower or had to run so slowly that they were barely creeping through the field, they ran the shanks at shallower depths. The result was they only ripped slots in the soil, which was not conducive to good stands or high yields due to the lack of uniform horizontal fracture.
In recent years, the philosophy has changed and many agronomists suggest working the soils about 10 inches deep to maintain some of the soil’s structure to hold the weight of the larger, heavier equipment is use today. For these reasons and others, tillage tools that run at shallower depths — but still produce a horizontal fracture — have gained in popularity and usage.
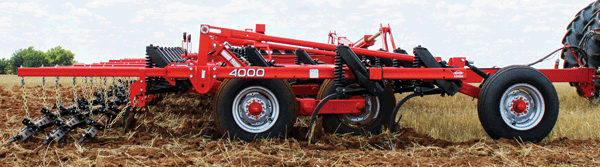
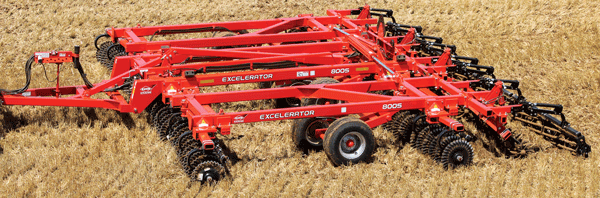
Disc/Harrow. This group of tillage tools falls into the category of primary tillage that, in some cases, is also used in secondary operations. Harrows, or discs, are primarily used to level the soil surface, redistribute surface residue, pulverize clods and disturb germination of weeds.
Disc/harrows are usually utilized as primary tillage tools, but in some cases can be used in secondary operations. Typically, they are used to kill weeds and to loosen the soil and can be effective in filling ruts or removing heavy equipment tracks. Photo Courtesy of Summers MFG.
They are considered conventional (or horizontal) tillage tools, often designed to kill weeds and loosen the soil. They have a tendency to create clods and to shear the soil, but because they move soil back and forth, they can be particularly effective for filling ruts and combine tracks. They are also pretty good for weed control.
These types of tillage tools have been used in farming “forever.” They have and will continue to have a place in fieldwork. Conventional tillage producers often use a disc harrow every year, while those who practice vertical or minimum tillage will use it as needed.
The disc is a fairly good tool to chop and bury residue and get it down in contact with the soil for quick decay. They typically use a curved blade run at an angle. As a result, they create a lot of clods, so it’s not a particularly good tool for seedbed preparation.
The downside of using a disc harrow is it creates a horizontal density layer in the soil. Often growers will correct this by running a vertical tool after discing to reset the profile.
High Speed Disc. These were originally dubbed “compact discs” because of their configuration. There are different versions within this group of tillage tools. The first were introduced to North America from Europe and featured European-style parallel gangs. These are sometimes used for primary-type tillage, but are used more often as secondary tools. They are considered a conventional (horizontal) tillage implement and they can create clods. They’re pretty good at killing weeds, but are challenged by heavy residue and wet conditions.
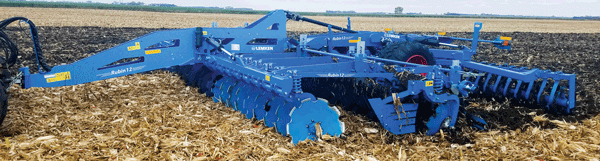
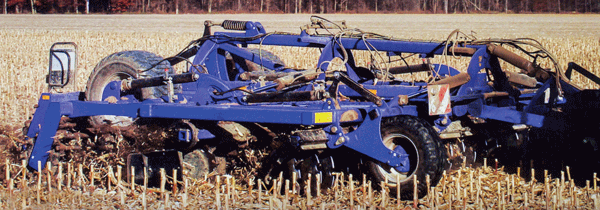
High speed discs should not be mistaken for true vertical tillage tools. These tools operate best when they run fast (9-10 mph). They are effective in killing weeds and do a good job in preparing a seedbed. Photos Courtesy of: upper - Lemken, lower - Penta
What many growers like about them is reflected in their generic name — high speed discs — they are fast. In fact, running these through a field at 9-10 mph is not unusual. They are actually more effective and efficient at high speeds, as you might guess. They require about 9-10 horsepower per foot, so a 40 foot high speed disc would require about 400 horsepower to operate the way it was designed
These types of tools use concave blades running at an angle and they create a density change in the soil profile. Typically they run smaller diameter blades. For example, most U.S. disc harrows are running at least 22 inch diameter blades if not 24 or 26 inch blades. Most high speed discs are running 20 inch blades, so they don’t perform as well in super high crop residue situations.
Overall, they are fast, they do kill weeds and they will prepare a pretty nice seedbed, but it is conventional tillage and should not be confused with vertical tillage. Running 2-3 or possibly 4 inches deep, they will create a horizontal layer in the soil, which is not conducive to high corn yields or good stands.
Reportedly, this equipment is popular in Europe because government programs are based on subsidies for each pass made in the field. It’s not unusual for European farmers to plow and disc, and disc again.
There are no “field pass” incentives for American farmers. So, given the choice, they tend to minimize field passes as much as possible even with the high level of residues created by high corn yields and continue to search for ways to reduce the number of passes they make through a field.
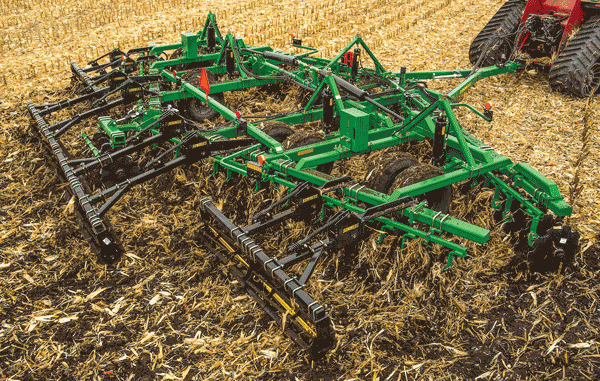
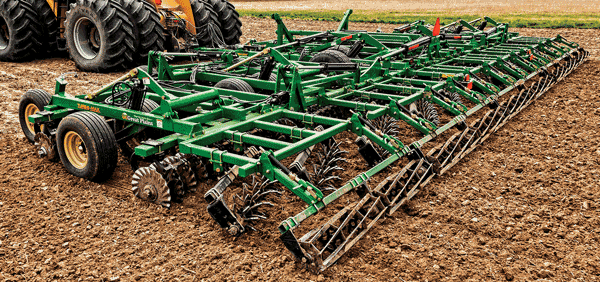
One-Pass Tool. Manufacturers have introduced a whole host of one-pass tools under various names during the last decade or so. These implements combine more than one — usually two, three or more — operations in one pass across a farm field. They are all designed to reduce the grower’s labor, time, fuel and machinery costs, while at the same time minimizing soil compaction.
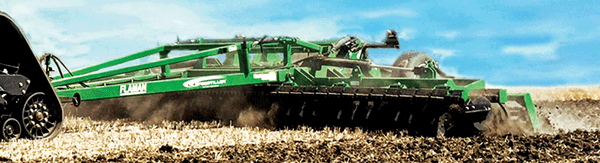
One-pass tools are able to combine 2-3 tillage operations into a single pass, thus saving time, fuel and helping minimize soil compaction resulting from running over the same ground several times. Photos Courtesy of: upper - K-Line, lower - McFarlane
Generally, these implements are able to handle more residue than a field cultivator, and do a good job of killing weeds while getting a seedbed ready for planting. Horsepower requirements range between 8-10 per foot (width of the tool). A 48 foot one-pass tool would take about 450 horsepower.
In the case of tillage operations, a typical one-pass tool could consist of a row of high speed discs or straight coulter blades followed by a field cultivator. This allows the tool to handle considerably more residue than a field cultivator alone.
In corn production, whether it’s rotated with soybeans or corn-on-corn, heavy residue is a big challenge. The conventional approach to tillage in this example would be to run some heavy tillage, then disc it and then field cultivate it. A one-pass tool would basically eliminate the disc pass. Typically the disc in the front will size the residue enough so that it can get it through the field cultivator, eliminating a tillage pass. You went over it once with that finish tool instead of with a disc and a field cultivator.
Some growers will use a disc chisel equipped with a rear-mounted harrow in the fall followed by a spring pass with a “one-pass” tool and then plant. Instead of doing four trips, the grower does only two with the same results.
Field Cultivator. These tools fall into the category of secondary tillage and are classified as conventional, or horizontal, tillage tools. The field cultivator is designed for light tillage, field finishing and incorporating herbicides. Field cultivators equipped with sweeps, often 9-10 inches wide, do extensive horizontal and vertical soil mixing. Sweeps are the choice for herbicide incorporation, killing small weeds and burying more residue than those equipped with spiked points.
Field cultivators are categorized as secondary tillage tools usually used for light tillage, field finishing and incorporating herbicides. They are very good at killing weeds and preparing a seedbed. Photo Courtesy of Kuhn
Overall, a field cultivator does a good job of killing weeds and is a good seedbed tool. It’s a highly productive tillage tool and requires only about 6-8 horsepower per foot.
The biggest downside of the field cultivator is, because it’s a horizontal tool, it shears the soil and changes its profile, leaving a density layer a few inches below the surface, which reduces standability and negatively impacts crop yields.
A large number of growers still use a field cultivator, largely because it kills weeds so effectively. With the increase of glyphosate-resistant weeds, it’s not inconceivable that field cultivators, and possibly some one-pass tools, will see increased use in the future.
This could also prompt the use of more vertical tillage that can be used to eliminate the density layer in the soil profile that is created by these tools.
Vertical Tillage Finish Tool. “True” vertical tillage tools are designed with straight blades running at no angle, which allows them to maintain uniform soil density (no shearing or density layer). When this tool operates as “true vertical,” it effectively sizes residue, creates virtually no clods and leaves a smooth bottom seedbed 2 inches deep at planting depth for good seed placement that will encourage uniform emergence. Vertical tillage is not an effective weed killer. It fits in the secondary tillage category and requires roughly 10 horsepower per foot to pull them at their “sweet speed” of 8-10 mph.
“True” vertical tillage tools employ straight blades running at no angle, which allows them to maintain uniform soil density. While not an effective weed killer, these tools size residue and leave a smooth bottom seedbed for good seed placement to enhance uniform plant emergence. Photos Courtesy of: upper - Great Plains, lower - Kuhn
True vertical tillage was introduced about 10 years ago and has continued to grow in popularity among farmers because it doesn’t contribute to dense soil layers and provides a smooth seedbed, which improves the planting process.
It needs to be repeated here that high speed discs that leave clods and a rough seedbed, are not “true” vertical tillage tools and this needs to be recognized by dealership salespeople when helping farm customers determine what tillage tool they need to properly perform and to get the required results needed in their cropping operations. Most of the manufacturers who produce high speed discs make it clear that their equipment falls in to the primary tillage category and is not designed to function as a vertical tillage finish tool.
The subject of vertical tillage was covered in-depth in the March 2014 issue of Farm Equipment (“What is Vertical Tillage Anyway?”). The following comments aimed at defining vertical tillage were gleaned from that report.
Agronomically speaking, vertical tillage is any tillage operation that does not cause a horizontal shearing or smearing plane in the soil profile, which could potentially lead to a soil density change within or below the tillage operation. This could be deep or shallow operation, but most common is shallow.
Vertical tillage is designed to assist in the management of residue while mixing soil to create a seedbed promoting residue decomposition into organic matter. The depth of operation for shallow vertical tillage is usually determined to be no deeper than the planting depth of the seed in order to avoid a potential change in soil density.
Abrupt changes in soil density can lead to delays in plant root development, thus slowing the growth and productivity of the plant. To this end, most vertical tillage equipment is comprised of vertical cutting blades at no angle.
Spike Tooth Harrow. This tillage tool is also referred to as a “peg tooth” harrow. Harrows are often attached to the rear of discs, field cultivators or, in some cases, drills. The spike tooth harrow is used as a leveling tool. It is categorized as secondary tillage and also fits in the vertical classification. It’s most suited for smoothing surface soils, redistributing crop residue, breaking clods and firming the seedbed for better seed placement to support uniform emergence. It’s among the lightest of tillage tools, requiring only about 5-6 horsepower per foot.

The spike/peg tooth harrow is best suited for smoothing surface soils, redistributing crop residue, breaking clods and firming the seedbed for better seed placement. Photo Courtesy of Great Plains
In the case of very loose and fluffy soils, spike tooth harrows are used to remove air pockets and to firm the soil to provide a more consistent soil density and seedbed before planting. In rough ground, it’s the most effective tool to knock off high spots and redistribute that soil into the low areas, providing a smooth, level surface.
Final Thoughts
For many growers not tilling their soils is not an option. For a wide range of reasons, from eliminating compaction to killing weeds or reducing the chances for disease, tillage will be part of many farming operations for a long time to come.
To introduce new concepts in tillage, recognize that you’re dealing with early adopters, eventual adopters and never adopters. Focus on the bell cows, those who are the leaders in your trade area, and begin with them. The others will come along on their own.
Dealership salespeople must focus on bringing value to their customers. You do this by asking the right questions (see “5 Questions to Ask When Selling Tillage Tools” below) and by understanding the system they’re using. Then it’s a matter of having enough knowledge, or becoming a SME (subject matter expert) about the tools available (not just what’s sitting on the lot) and how they’re applied to solve a customer problem or improve their operation.
5 Questions to Ask When Selling Tillage Tools
Dave Kanicki, Executive Editor
During a visit with Jamie Meier, sales manager for the Ag Division of Landoll Corp., at a farm equipment show last year, we got into a discussion about how well dealership salespeople sell tillage equipment.
He said, “There are clearly some guys out there that are on top of it, but I think there are more who do not understand the different tools and options out there today. There are so many products sold in the dealerships today, that it’s very difficult to be an expert on everything. There are a lot of tillage options out there and it gets confusing for the salespeople as well as the producers.”
In a follow-up to that conversation, we asked him what questions should the salesperson be asking to determine the correct tillage equipment a farmer needs and why. He offered the following 5 questions.
1 Are you looking to do primary or secondary tillage?
“In other words, are they dealing with heavy, post-harvest residue, compacted soils or do they need to prepare a seedbed? I know everyone would like one tool to do everything, but that’s a tough order depending on the conditions and soil type.
“There is a large offering of residue management tools offered these days and salespeople can get lost in all the choices and what they should be recommending. The next question needs to be whether the tool will be used for fall tillage or spring tillage, or possibly both. If they’re trying to use one tillage tool for all operations, I would lean toward last pass before planting and maybe give up a little bit of performance capability in the fall if they’re trying to achieve both spring and fall tillage.
2 What is your tillage system and what tools are you currently using?
“Along with the answer to question one, this gives you a platform or basis for where the customer is. If they’re not satisfied with their current process, what is it that they’re not happy with. Their response tells you where you need to go next. If it’s a tool that’s not performing well enough in the spring, then they may need a specialized tool that’s spring only, but you also need to consider what operations were performed prior to spring. You need to understand where they’re coming from before you can take them to the next level. If everything’s working well, they might want just upgrade or replace what they have.
3 What do you want to change or improve with your tillage system?
“Every producer would like to reduce the number of trips across the field in an effort to minimize costs. Or, they may be having issues with resistant weeds.
“Asking questions can also reveal other things about the producer’s operation that might not seem relevant at first, but can provide clues of where they need to be in terms of tillage. For example, there’s growing interest in high speed tillage. Are they only interested in getting through their tillage chores faster or are they also looking at high speed planters? If that’s the case, they will need to do a better job of preparing a seedbed, which could mean some different tools in their tillage program.
“With all of the emphasis on managing residue the last few years, the producer may have forgotten to consider soil compaction. It might be time for them to reset their soil density. Taking time to understand the whole operation, will provide the opportunity to direct them toward a specific tool.”
4 How much horsepower do you have available?
“Horsepower is often the limiting factor in what your customer is able to do to improve or upgrade their tillage practices. This is especially true when it comes to primary tillage. Those with higher horsepower available obviously have more tillage options. They’re able to utilize some of the higher speed tillage tools, for example, with the recommended speed of these tools approaching 8-10 mph, the horsepower requirements are much more substantial. Tillage options become more limited if the available horsepower is under 300. Salespeople need to know this before they begin directing their customer toward a particular tillage tool.”
5 When do you plan to purchase the new tool?
“This is one way to ask for the order, by figuring out when their intended use season will be. Depending on the manufacturer, certain tools may only be produced during a particular time of year, so unless the dealer has the unit in stock, they should consider availability in the equation.”


Post a comment
Report Abusive Comment